Bird watching in UK gardens has never been more exciting, thanks to the rise of smart bird feeder cameras. For beginners, setting up the perfect bird feeder camera can unlock a new world of wildlife observation and photography right outside your window. This comprehensive guide will walk you through every step, ensuring you capture stunning moments and attract a vibrant array of garden birds.
What you need before setting up a bird feeder camera
Before diving into the technical aspects of your Bird Watching Tips for Beginners feeder camera set-up, it’s essential to define what success looks like for your UK garden. Are you hoping to identify rare species like goldfinches or bullfinches, capture high-quality images for wildlife photography, or simply enjoy watching local birds with your family? Perhaps you’re interested in contributing to citizen science projects or creating content for social media. Setting clear, specific goals will help you choose the right equipment and measure your progress effectively, ensuring your investment delivers the results you’re seeking.
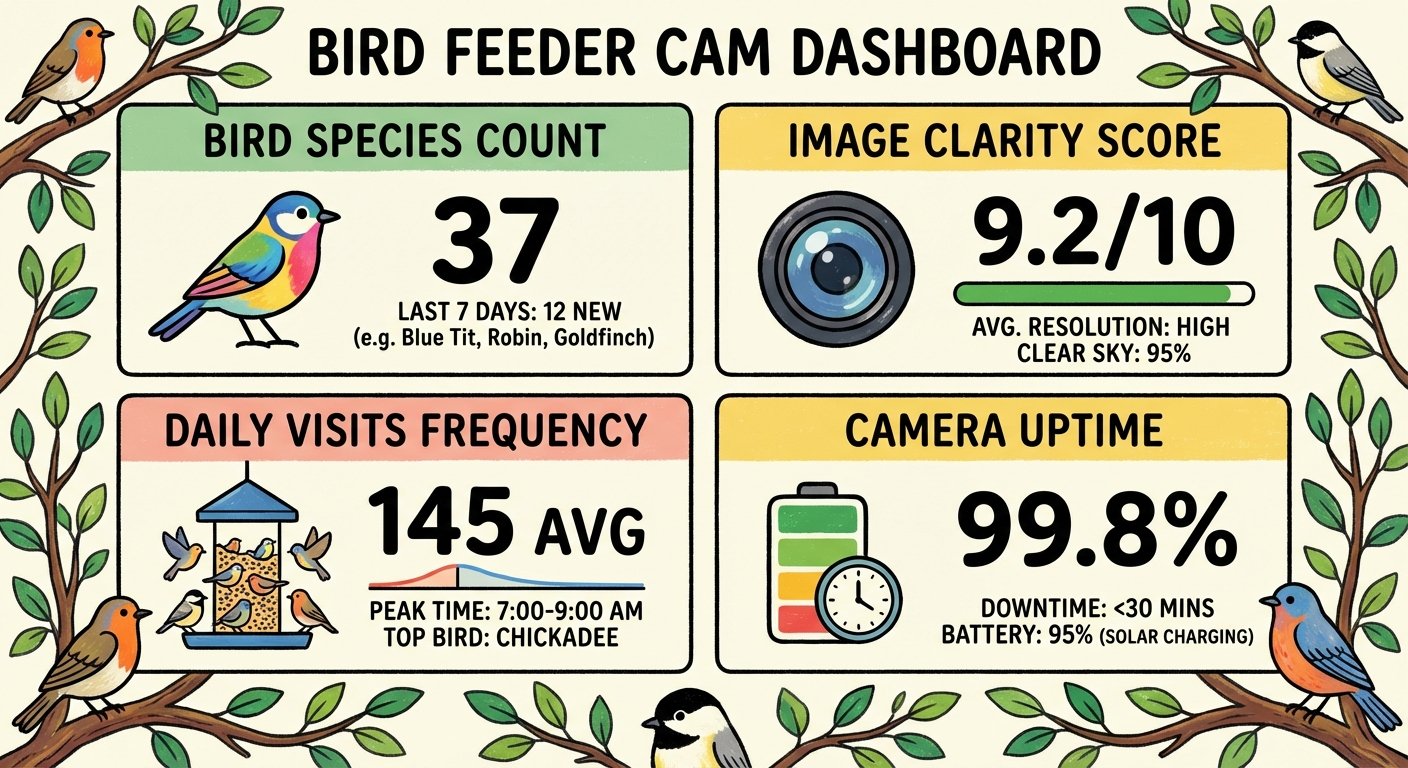
Key performance indicators (KPIs) for a successful bird feeder camera set-up include the number of bird species captured, image clarity and resolution, frequency of bird visits throughout different seasons, and ease of camera operation for all family members. For example, you might aim to record at least five different bird species within the first month, achieve consistent 1080p video quality in varying weather conditions, or capture feeding activity during both dawn and dusk periods. Other meaningful metrics could include the percentage of clear, usable footage versus blurry shots, battery life performance in winter conditions, or successful motion detection accuracy that minimizes false triggers from wind or leaves.
Creating a systematic approach to tracking your bird watching success will enhance both your enjoyment and learning experience. Consider maintaining a digital log using apps like eBird or a simple spreadsheet to record bird sightings, photo quality ratings, weather conditions, and any notable behaviors such as aggressive feeding patterns or unusual species interactions. Over time, this data will reveal fascinating patterns in bird activity – you might discover that certain species prefer morning visits while others are more active in late afternoon, or that rainy days actually increase feeder traffic as natural food sources become scarce.
Visual documentation extends beyond just the camera footage itself. Creating a seasonal comparison chart showing which birds visit during different months can help you plan feeder refills and anticipate exciting arrivals like winter migrants or summer breeding visitors. Many enthusiasts find success using simple tools like Google Sheets to create graphs showing daily bird visits, species diversity over time, or even correlations between weather patterns and feeding activity. This visual approach not only helps you optimize your setup but also creates shareable content that can inspire friends, family, or online communities of fellow bird watchers.
Budget planning is another crucial preparatory step that many beginners overlook. Beyond the initial camera investment, consider ongoing costs such as bird food (different species prefer different seeds), weatherproofing materials, potential mounting hardware upgrades, and seasonal maintenance supplies. A typical starter setup might require £150-300 for a decent camera, £20-40 monthly for quality bird food, and occasional expenses for cleaning supplies or replacement parts. Planning these costs upfront prevents disappointment and ensures your bird watching hobby remains sustainable and enjoyable throughout the year.
Where to place your bird feeder camera in the garden
Preparation is the foundation of a successful bird feeder camera set-up. Start by researching which bird species are common in your region and what types of feeders and food they prefer. In the UK, species like robins, blue tits, and goldfinches are frequent visitors, each with unique feeding habits. Understanding these preferences will help you select the most effective feeder and camera placement for your garden.
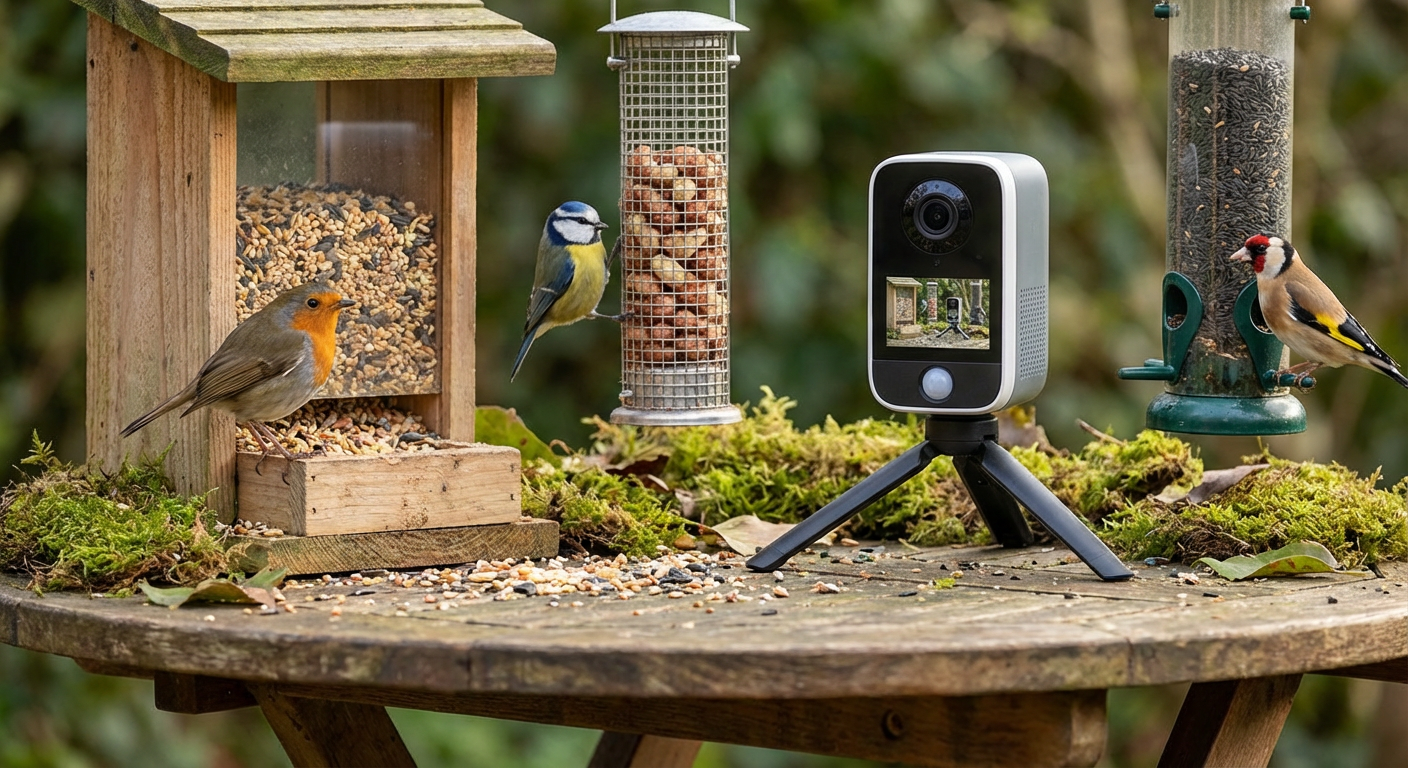
Gathering the right tools and resources is crucial. At a minimum, you’ll need a reliable bird feeder, a compatible camera (such as a smart feeder camera or a weatherproof action camera), mounting equipment, and a stable Wi-Fi connection for live streaming or remote access. Many beginners find value in reading user reviews and expert Guide to Smart Bird Feederss, such as those from birdwatching communities or trusted wildlife organizations, to compare camera features and feeder designs.
The ideal location for your bird feeder camera combines visibility, safety, and accessibility. Position your feeder 1.5 to 3 metres from natural cover such as bushes or trees, allowing birds to feel secure while feeding. This distance provides them with quick escape routes from predators while keeping them close enough for clear camera footage. Avoid placing feeders directly against windows or in completely open areas, as this can stress visiting birds and result in poor viewing angles.
Height placement is equally important for both bird comfort and camera performance. Mount your feeder between 1.2 to 2 metres above ground level – high enough to deter ground predators like cats, but low enough for easy maintenance and optimal camera angles. Consider the sun’s path throughout the day when positioning your setup, as backlighting can ruin footage quality. East or north-facing positions often provide the most consistent lighting conditions for clear recordings.
Environmental factors can significantly impact your camera’s performance and the birds’ willingness to visit. Ensure your chosen spot has reliable Wi-Fi coverage by testing the signal strength with your smartphone before installation. Shield the camera from direct rainfall and strong winds using natural barriers or purpose-built weather guards. Additionally, maintain a clear flight path to and from the feeder – avoid cluttered areas with hanging decorations or dense vegetation that might obstruct birds’ approach routes.
Common blockers in this phase include poor Wi-Fi coverage in the garden, unclear camera instructions, or difficulty attracting birds to a new feeder. Address these challenges by testing your Wi-Fi signal outdoors, choosing user-friendly camera models, and placing feeders in sheltered, visible spots with natural cover nearby. Patience is key; it may take a few days for birds to discover and trust a new feeding station.
How high should a bird feeder camera be?
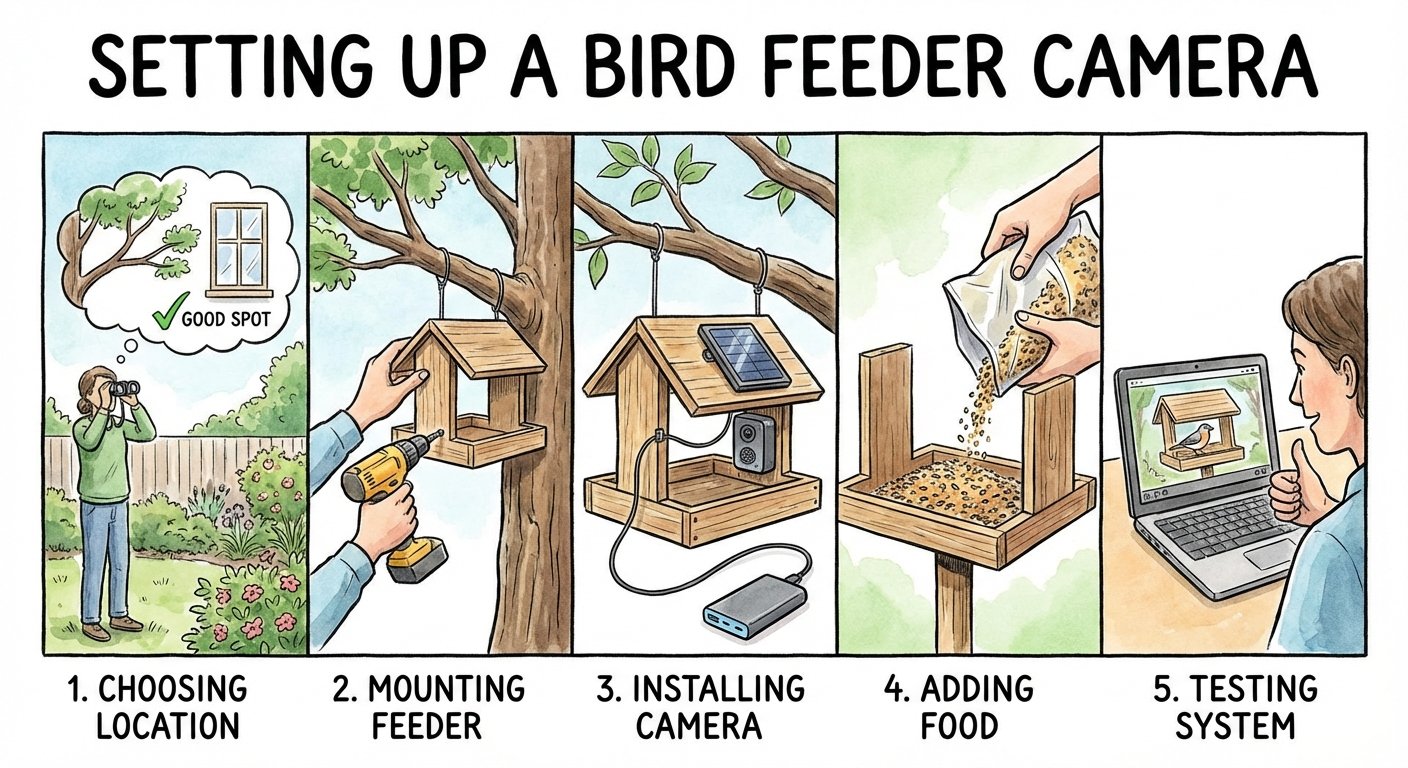
With your goals set and research complete, it’s time to bring your bird feeder camera set-up to life. Begin by selecting the optimal location for your feeder and camera. The 5-7-9 rule is a helpful guideline: place the feeder at least 5 feet off the ground, 7 feet from structures, and 9 feet from dense cover to deter squirrels and provide birds with a safe, accessible spot. Position the camera to capture a clear, unobstructed view of the feeder, ideally facing away from direct sunlight to avoid glare and overexposed footage.
When determining the exact height, consider the specific birds you want to attract. Ground-feeding species like robins and blackbirds prefer feeders positioned 3-4 feet high, while finches and tits are comfortable with feeders at 5-6 feet. For the best camera angles, mount your feeder at eye level or slightly below – typically 4-5 feet for most UK gardens. This height allows for intimate close-up shots while remaining accessible for maintenance and refilling.
Next, assemble your equipment with careful attention to stability and weatherproofing. Mount the feeder securely using galvanised brackets or shepherd’s hooks that can withstand British weather conditions, ensuring it remains stable even during strong winds or when larger birds like pigeons land. Attach your camera using weatherproof mounts or adjustable brackets, positioning it 2-3 feet away from the feeder for optimal frame coverage. Test the angle and focus before adding bird food, checking that the entire feeding area is visible and that branches or leaves won’t obstruct the view as they grow.
For smart bird feeder cameras, follow the manufacturer’s setup instructions carefully to connect to your home Wi-Fi network. Ensure your router signal reaches the installation area – you may need a Wi-Fi extender for garden locations far from your house. Download the accompanying mobile app and test all features, including motion detection sensitivity, notification settings, and video quality options. This connectivity allows you to receive real-time alerts when birds visit and view live footage from anywhere, perfect for monitoring activity while at work or on holiday.
Once installed, fill the feeder with appropriate food based on your target species and seasonal preferences. Sunflower hearts attract goldfinches, greenfinches, and various tit species, while nyjer seeds are particularly loved by goldfinches and siskins. Mealworms draw insect-eating birds like robins, wrens, and blackbirds, especially during breeding season when protein is crucial. Consider offering different food types in separate compartments or multiple feeders to attract a wider variety of species and create more dynamic footage.
Use this comprehensive checklist to ensure your setup is complete: feeder securely mounted and weatherproofed, camera positioned with clear view and connected to Wi-Fi, mobile app installed and tested, appropriate food added and fresh, and backup power source available if using battery-powered equipment. Monitor the setup for the first week, making small adjustments to camera angle, feeder position, or food offerings based on bird behavior and image quality. Pay attention to lighting changes throughout the day and seasons, as the sun’s position will affect your footage quality.
Track your progress and maintain optimal performance using this detailed monitoring approach:
Setup Phase: Choose location (feeder visible, safe, and accessible), mount feeder (stable and weatherproof), install camera (clear view, properly angled, connected to Wi-Fi), add food (species-appropriate and fresh), test system (live feed working, notifications enabled).
Ongoing Maintenance: Weekly food checks and refills, monthly camera lens cleaning, quarterly equipment inspection for wear or damage, seasonal adjustments for changing light conditions and vegetation growth.
As birds begin to visit regularly, familiarize yourself with your camera’s advanced features to maximize your wildlife photography potential. Many smart cameras offer motion detection zones that can be customized to reduce false triggers from swaying branches, species recognition technology that can identify and catalog different bird types automatically, and cloud storage options for building a comprehensive digital archive of your garden’s wildlife. Experiment with time-lapse photography to capture feeding patterns throughout the day, or use burst mode to capture the perfect action shot of birds in flight.
How to Attract Birds to Your Garden
Best seed and food for attracting common UK birds
Selecting the right seeds and food is crucial for attracting a diverse range of common UK birds to your feeder camera setup. Sunflower seeds are the gold standard – their high oil content makes them irresistible to goldfinches, greenfinches, and blue tits. Black sunflower seeds are particularly effective as they have thinner shells that smaller birds can crack more easily. Niger seeds are excellent for attracting goldfinches and siskins, while mixed seed blends containing millet, canary seed, and wheat will draw ground-feeding species like robins, blackbirds, and house sparrows.
For maximum species diversity, consider offering different food types in separate feeders within your camera’s field of view. Suet balls and fat cakes are magnets for woodpeckers, nuthatches, and treecreepers, providing essential high-energy nutrition especially during winter months. Mealworms – either dried or live – are irresistible to robins, wrens, and thrushes, while peanuts in mesh feeders will attract tits, woodpeckers, and squirrels (which can also make for entertaining footage). Fresh fruit like apples and pears can entice blackbirds and thrushes during autumn and winter.
Timing and presentation significantly impact your success rate. Place feeders at different heights to cater to various feeding preferences – hanging feeders for acrobatic species like blue tits, platform feeders for ground-feeders, and suet feeders attached to tree trunks for woodpeckers. Maintain a consistent feeding schedule, ideally topping up feeders early morning and late afternoon when bird activity peaks. During breeding season (March-July), avoid whole peanuts and large seeds that could choke nestlings, opting instead for smaller seeds and specialized breeding season mixes.
Keep your food fresh and dry by using feeders with good drainage and weather protection. Moldy or wet food can harm birds and deter visits, negatively impacting your camera footage quality. Store seeds in airtight containers to prevent pest infestations, and clean feeders regularly with a mild disinfectant solution. Consider seasonal variations – high-energy foods like suet and sunflower seeds are most important during winter, while protein-rich options like mealworms become crucial during spring breeding season when parent birds need to feed their young.
Maintaining Your Bird Feeder Camera
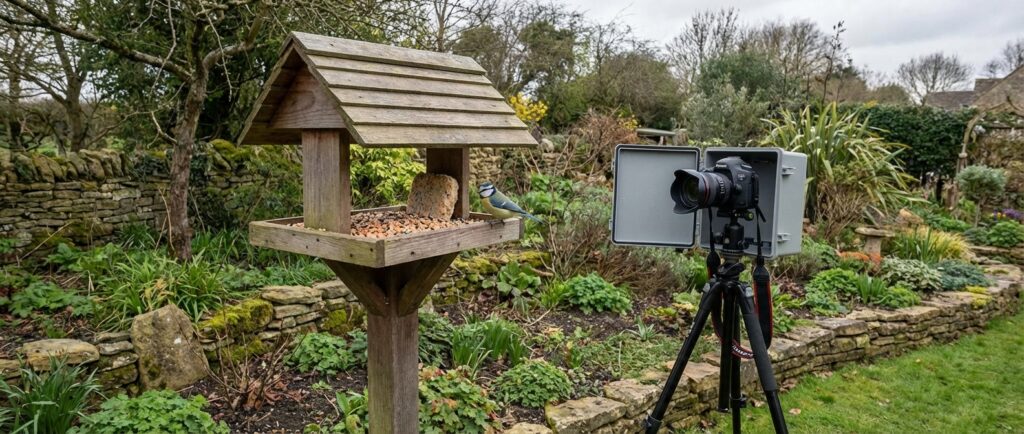
How to angle the camera for clear footage
Achieving crystal-clear footage from your bird feeder camera requires careful attention to positioning and angle. The ideal camera angle should capture the feeding area at a slight downward tilt of 15-20 degrees, allowing you to see both the birds’ backs and their distinctive markings. Position the camera approximately 1.5-2 metres away from the feeder to ensure the entire feeding area fits within the frame while maintaining enough detail to identify species characteristics like wing bars, breast patterns, and beak shapes.
Consider the lighting conditions throughout the day when setting your angle. Morning light from the east can create beautiful backlighting but may cause silhouetting, while afternoon western light often provides the warmest, most flattering illumination for bird photography. Avoid pointing the camera directly into the sun, as this will result in overexposed footage and make bird identification nearly impossible. Instead, position your setup so natural light falls across the feeding area from the side, creating depth and highlighting the birds’ plumage details.
Height placement is equally crucial for optimal footage quality. Mount your camera at approximately the same level as the feeder or slightly above it. This positioning minimises the risk of branches or other garden elements obstructing your view while providing a natural perspective that showcases the birds’ behaviour. If you’re using a pole-mounted system, ensure the camera is stable and won’t shake in windy conditions, as even slight movement can blur your footage and make it difficult to capture sharp images of fast-moving birds.
Test your camera angle by observing the live feed during different times of day and weather conditions. You may need to make minor adjustments seasonally as the sun’s path changes and vegetation grows. Many successful bird watchers recommend taking screenshot samples from your footage at various times to evaluate image quality and make incremental improvements to positioning. Remember that patience is key – it may take several days of fine-tuning to achieve the perfect angle that captures both stunning visuals and clear behavioural footage of your garden visitors.
How to keep the feeder safe from rain, squirrels and large birds
Protecting your bird feeder camera setup from the elements and unwanted visitors is crucial for maintaining clear footage and ensuring your target birds can feed safely. Rain poses the biggest threat to both your camera equipment and bird food, so investing in a quality feeder with a built-in roof or adding a separate baffle above the feeding area is essential. Look for feeders with deep overhangs that extend well beyond the feeding ports, and consider positioning your setup under natural shelter like tree branches or eaves when possible.
Squirrels are notorious for their acrobatic abilities and determination to reach bird food, often creating chaotic footage that obscures your target birds. Install a squirrel baffle either above or below your feeder – pole-mounted baffles should be at least 5 feet from the ground and 8 feet from any jumping-off points like trees or fences. Weight-activated feeders that close feeding ports when heavier animals land are particularly effective, though ensure the mechanism doesn’t block your camera’s view of the feeding action.
Large birds such as crows, magpies, and wood pigeons can dominate feeders and scare away smaller species you’re hoping to photograph. Use caged feeders that allow small birds access while excluding larger ones – the cage bars should be spaced approximately 1.5 inches apart for optimal results. Alternatively, choose feeders with weight-activated perches that close under the weight of larger birds, or opt for specialist feeders designed for specific bird types like nyjer seed feeders that naturally attract finches and siskins.
Regular maintenance is key to keeping your setup functioning properly throughout the seasons. Check and clean your camera lens weekly, especially after storms, and ensure all protective covers remain secure. Trim back any vegetation that might grow to obstruct your camera view or provide new launching points for squirrels. During winter months, consider using heated bird baths nearby to provide an additional draw for birds while preventing water features from freezing and potentially damaging your equipment.
Common bird feeder camera set-up mistakes to avoid
Setting up a bird feeder camera may seem straightforward, but several common mistakes can significantly impact your wildlife photography results. Understanding these pitfalls before you begin will save you time, frustration, and potentially expensive equipment damage.
One of the most frequent errors is positioning the camera too close to the feeder. While it might seem logical to get as close as possible for detailed shots, placing your camera within 2-3 feet often startles birds and creates an unnatural feeding environment. Most birds need a clear escape route and will avoid feeders that feel confined. Instead, position your camera 4-6 feet away and use optical zoom to capture intimate details without disturbing your feathered subjects.
Poor weatherproofing represents another critical mistake that can destroy expensive equipment. Many beginners underestimate the UK’s unpredictable weather conditions, leaving cameras vulnerable to morning dew, sudden downpours, or frost damage. Even cameras marketed as “weather-resistant” may not withstand prolonged exposure to British weather. Always invest in proper housing or covers, and consider adding silica gel packets to prevent internal condensation during temperature fluctuations.
Incorrect lighting setup frequently ruins otherwise perfect bird photography opportunities. Positioning feeders in deep shade or directly facing harsh sunlight creates exposure challenges that even advanced cameras struggle to handle. The ideal setup places your feeder in an area that receives soft, diffused natural light throughout the day – perhaps under the edge of tree cover or beside a north-facing wall. Avoid backlighting situations where birds appear as silhouettes against bright skies, and be mindful of how shadows from nearby structures might affect your shots during different times of day.
Finally, many newcomers make the mistake of expecting immediate results and frequently disturbing their setup to check progress. Birds are creatures of habit and need time to discover and trust new feeding locations. Constantly adjusting camera angles, moving feeders, or checking memory cards can reset this trust-building process. Once you’ve positioned everything correctly, resist the urge to tinker for at least a week, allowing local bird populations to establish regular feeding patterns that will ultimately provide you with more natural and rewarding footage.
Frequently Asked Questions
Where is the best place to put a bird feeder camera?
The best place to put a bird feeder camera is in a quiet, sheltered part of the garden where birds feel safe visiting. Ideally, it should be close enough to shrubs, hedges or a small tree to give birds somewhere to perch and retreat to, but not so close that predators can hide nearby.
It is also worth thinking about the camera view. A good position will give you a clear background, decent natural light and a stable mounting point. Try to avoid very exposed areas, busy walkways and spots directly facing harsh sunlight, as these can reduce bird activity and make footage less clear.
How high should a bird feeder camera be?
A bird feeder camera is usually best placed around 1.2 to 1.8 metres above the ground. This height works well for many UK garden birds and makes it easier to keep the feeder visible, accessible and safe from some ground disturbance.
The exact height depends on your garden and the birds you want to attract. Too low, and the feeder may be vulnerable to pets or feel unsafe to birds. Too high, and it may be harder to refill, clean and position properly for clear footage. In most gardens, a moderate height that is easy to maintain works best.
Do birds get used to feeder cameras?
Yes, most birds do get used to feeder cameras over time, especially if the feeder stays in the same place and the area feels calm and safe. Birds are usually far more concerned about movement, noise and sudden changes than the presence of a small camera itself.
Once they learn that the feeder is a reliable source of food and not a threat, many garden birds will start visiting it naturally. Keeping the set-up consistent, using suitable food and avoiding frequent repositioning will help birds settle more quickly.
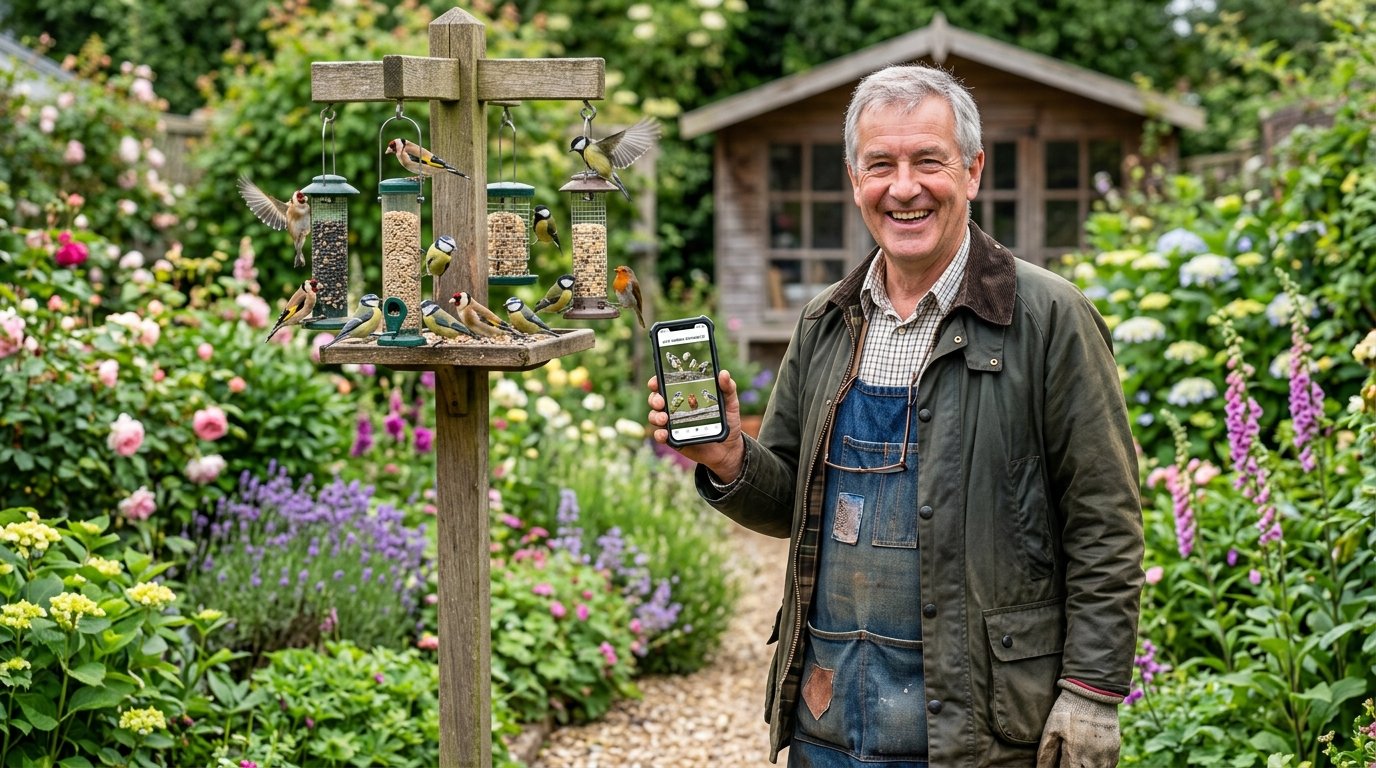
Setting up a bird feeder camera in your UK garden is a rewarding journey that brings nature closer and creates endless opportunities for discovery. By following this structured playbook—from goal setting to ongoing optimization—you’ll not only attract a wider variety of birds but also capture stunning moments that enrich your connection to local wildlife. Whether you’re a beginner or a seasoned enthusiast, the right approach ensures every day brings new surprises and learning experiences.